Why 3D Human Scan Registration Is Hard
A 3D human scan is easy for us to read. We look at it and immediately know where the torso, legs, shoulders, front, and back are. For a computer, the same scan is only geometry: vertices, faces, and coordinates.
That missing anatomy matters. Once a scan is registered, we can measure body regions consistently across people: segment lengths, cross-sections, volumes, surface areas, and landmarks. It also makes scan data more useful for personalized biomechanical models, where geometry alone is not enough. We need to know which body region each part of the geometry belongs to.
BODIESReg is an open-source pipeline for registering SMPL-family parametric body models to 3D human scans. Here, we start from the basic idea of registration, then show where registration can fail and how BODIESReg tackles that failure.
What Is Registration?
Registration means assigning anatomical meaning to a raw scan by matching it to a body model whose anatomy is already known. A body model such as SMPL is also a surface, but it comes with structure. Its vertices have fixed identities. Its skeleton, joints, pose parameters, shape parameters, and body regions are defined in advance. If we can match this known template to an unknown scan, then labels from the template can be transferred to the scan.
This transfer is what we want from registration. We start with a target point cloud that has geometry but no semantic structure. We end with a scan whose vertices can be interpreted through template correspondence: this region is the upper leg, this vertex is near the hip, this vertex belongs to the torso, and so on. Scanning gives us geometry and registration gives that geometry anatomical meaning.
In practice, this means that each template vertex can be matched to a nearby part of the scan. Once that match exists, anatomical labels from the template can be transferred to the scan. This is how raw geometry becomes useful for landmark extraction, segmentation, and measurement.
How Registration Is Performed
Registration requires correspondence between the template and the scan. We do not know in advance which scan vertex should match which template vertex. A common strategy is therefore indirect:
- Move and deform the template until it lies close to the scan.
- For each template vertex, choose a nearby scan vertex, often the nearest neighbor.
- Transfer labels from template vertices to their matched scan vertices.
This nearest-neighbor step depends strongly on where the template is placed before matching. If the arm of the template starts near the torso in the scan, nearest-neighbor matching may connect arm vertices to torso vertices. The match is geometrically close, but anatomically wrong.
For SMPL-family models, the template is not moved vertex by vertex. Instead, the mesh is generated from pose and shape parameters. We can write this as
\[M: (\boldsymbol{\beta},\boldsymbol{\theta}) \mapsto M(\boldsymbol{\beta},\boldsymbol{\theta}),\]where $\boldsymbol{\beta}$ controls body shape and $\boldsymbol{\theta}$ controls pose. Registration then becomes an optimization problem: find pose and shape parameters that place the generated mesh close to the scan.
A common distance objective is the bidirectional Chamfer distance. Here, $\mathcal{V}(\boldsymbol{\beta},\boldsymbol{\theta})$ denotes the template vertices generated from pose and shape parameters, and $\mathcal{S}$ denotes the scan vertices.
\[E(\boldsymbol{\beta},\boldsymbol{\theta}) = \frac{1}{|\mathcal{V}|} \sum_{\mathbf{v}\in\mathcal{V}(\boldsymbol{\beta},\boldsymbol{\theta})} \min_{\mathbf{u}\in\mathcal{S}}\|\mathbf{v}-\mathbf{u}\| + \frac{1}{|\mathcal{S}|} \sum_{\mathbf{u}\in\mathcal{S}} \min_{\mathbf{v}\in\mathcal{V}(\boldsymbol{\beta},\boldsymbol{\theta})}\|\mathbf{u}-\mathbf{v}\|\]The first term is template-to-scan distance: it asks whether each template vertex has a nearby scan vertex. The second term is scan-to-template distance: it asks whether each scan vertex is explained by a nearby template vertex.
The video below shows why distance alone is a weak test for anatomical correctness. The blue point cloud is the input scan. The red point cloud is the template. We move the input scan relative to the fixed template using rotations, translations, and scale changes, and record the distance between the blue and red point clouds along each transformation. The plotted curve is only one path through a much larger parameter space, but it already shows the main problem: several different arrangements can produce similar distances, while only one arrangement has meaningful anatomical correspondence.
What BODIESReg Adds
BODIESReg changes the starting point for surface fitting. Instead of beginning from a default template pose, it estimates an approximate scan pose first, builds a pose-aligned template, and then optimizes pose and shape against the scan. It does this by projecting the 3D scan into two orthogonal 2D views, detecting anatomical keypoints in those views, and using inverse kinematics to place the body model near the scan. We use 2D projections because reliable keypoint detectors are usually trained on images, not directly on raw 3D meshes.
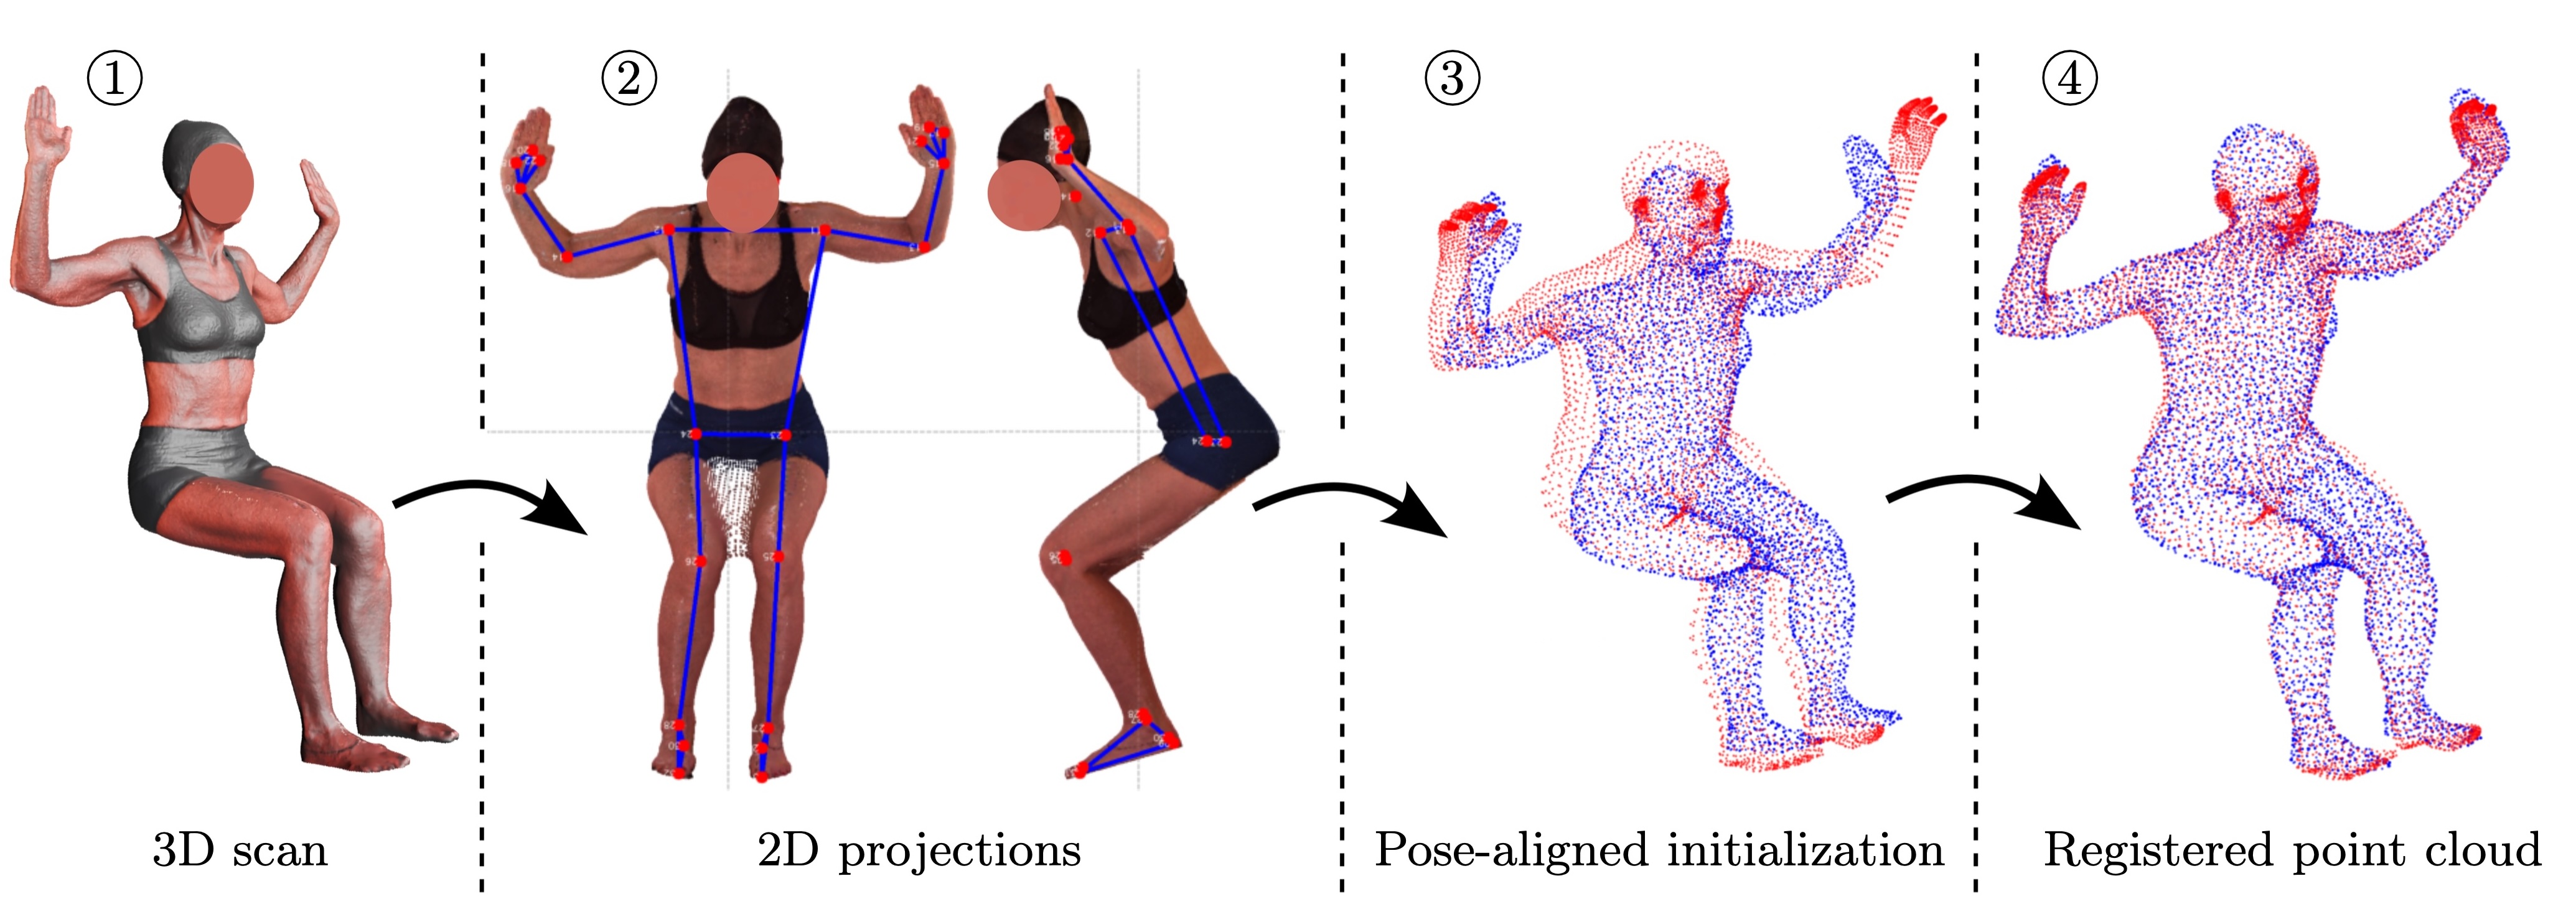
The video below shows intermediate steps in BODIESReg. Before final pose-and-shape optimization, BODIESReg estimates a pose-aligned initialization that brings the red template close to the blue scan. The later optimization then refines the fit. The distance decreases while the anatomy stays in the intended configuration.
In the second video, we show the same pose-and-shape optimization without pose-aligned initialization. The optimizer can still reduce the distance, but it converges to a wrong anatomical arrangement. After convergence, the distance curve is close to the pose-aligned case, shown in gray, yet the registered body is upside down. This is the central failure mode: distance can look acceptable while correspondence is wrong.
The main addition is not another distance metric. BODIESReg improves the initialization, bringing the template closer to the input scan before distance minimization starts. After this distance-based fitting, BODIESReg refines the correspondence once more so the final mesh is close to the scan with better vertex-level matches.
Limitations
Pose-aligned initialization depends on keypoint detection. If the detected keypoints are wrong, inverse kinematics can initialize the body model in the wrong pose, and surface fitting can carry that error forward. The example below is deliberately exaggerated: the visible outline suggests one body configuration, while the underlying anatomy is different. This is the kind of wrong visual cue that can make image-based keypoint detection fail.
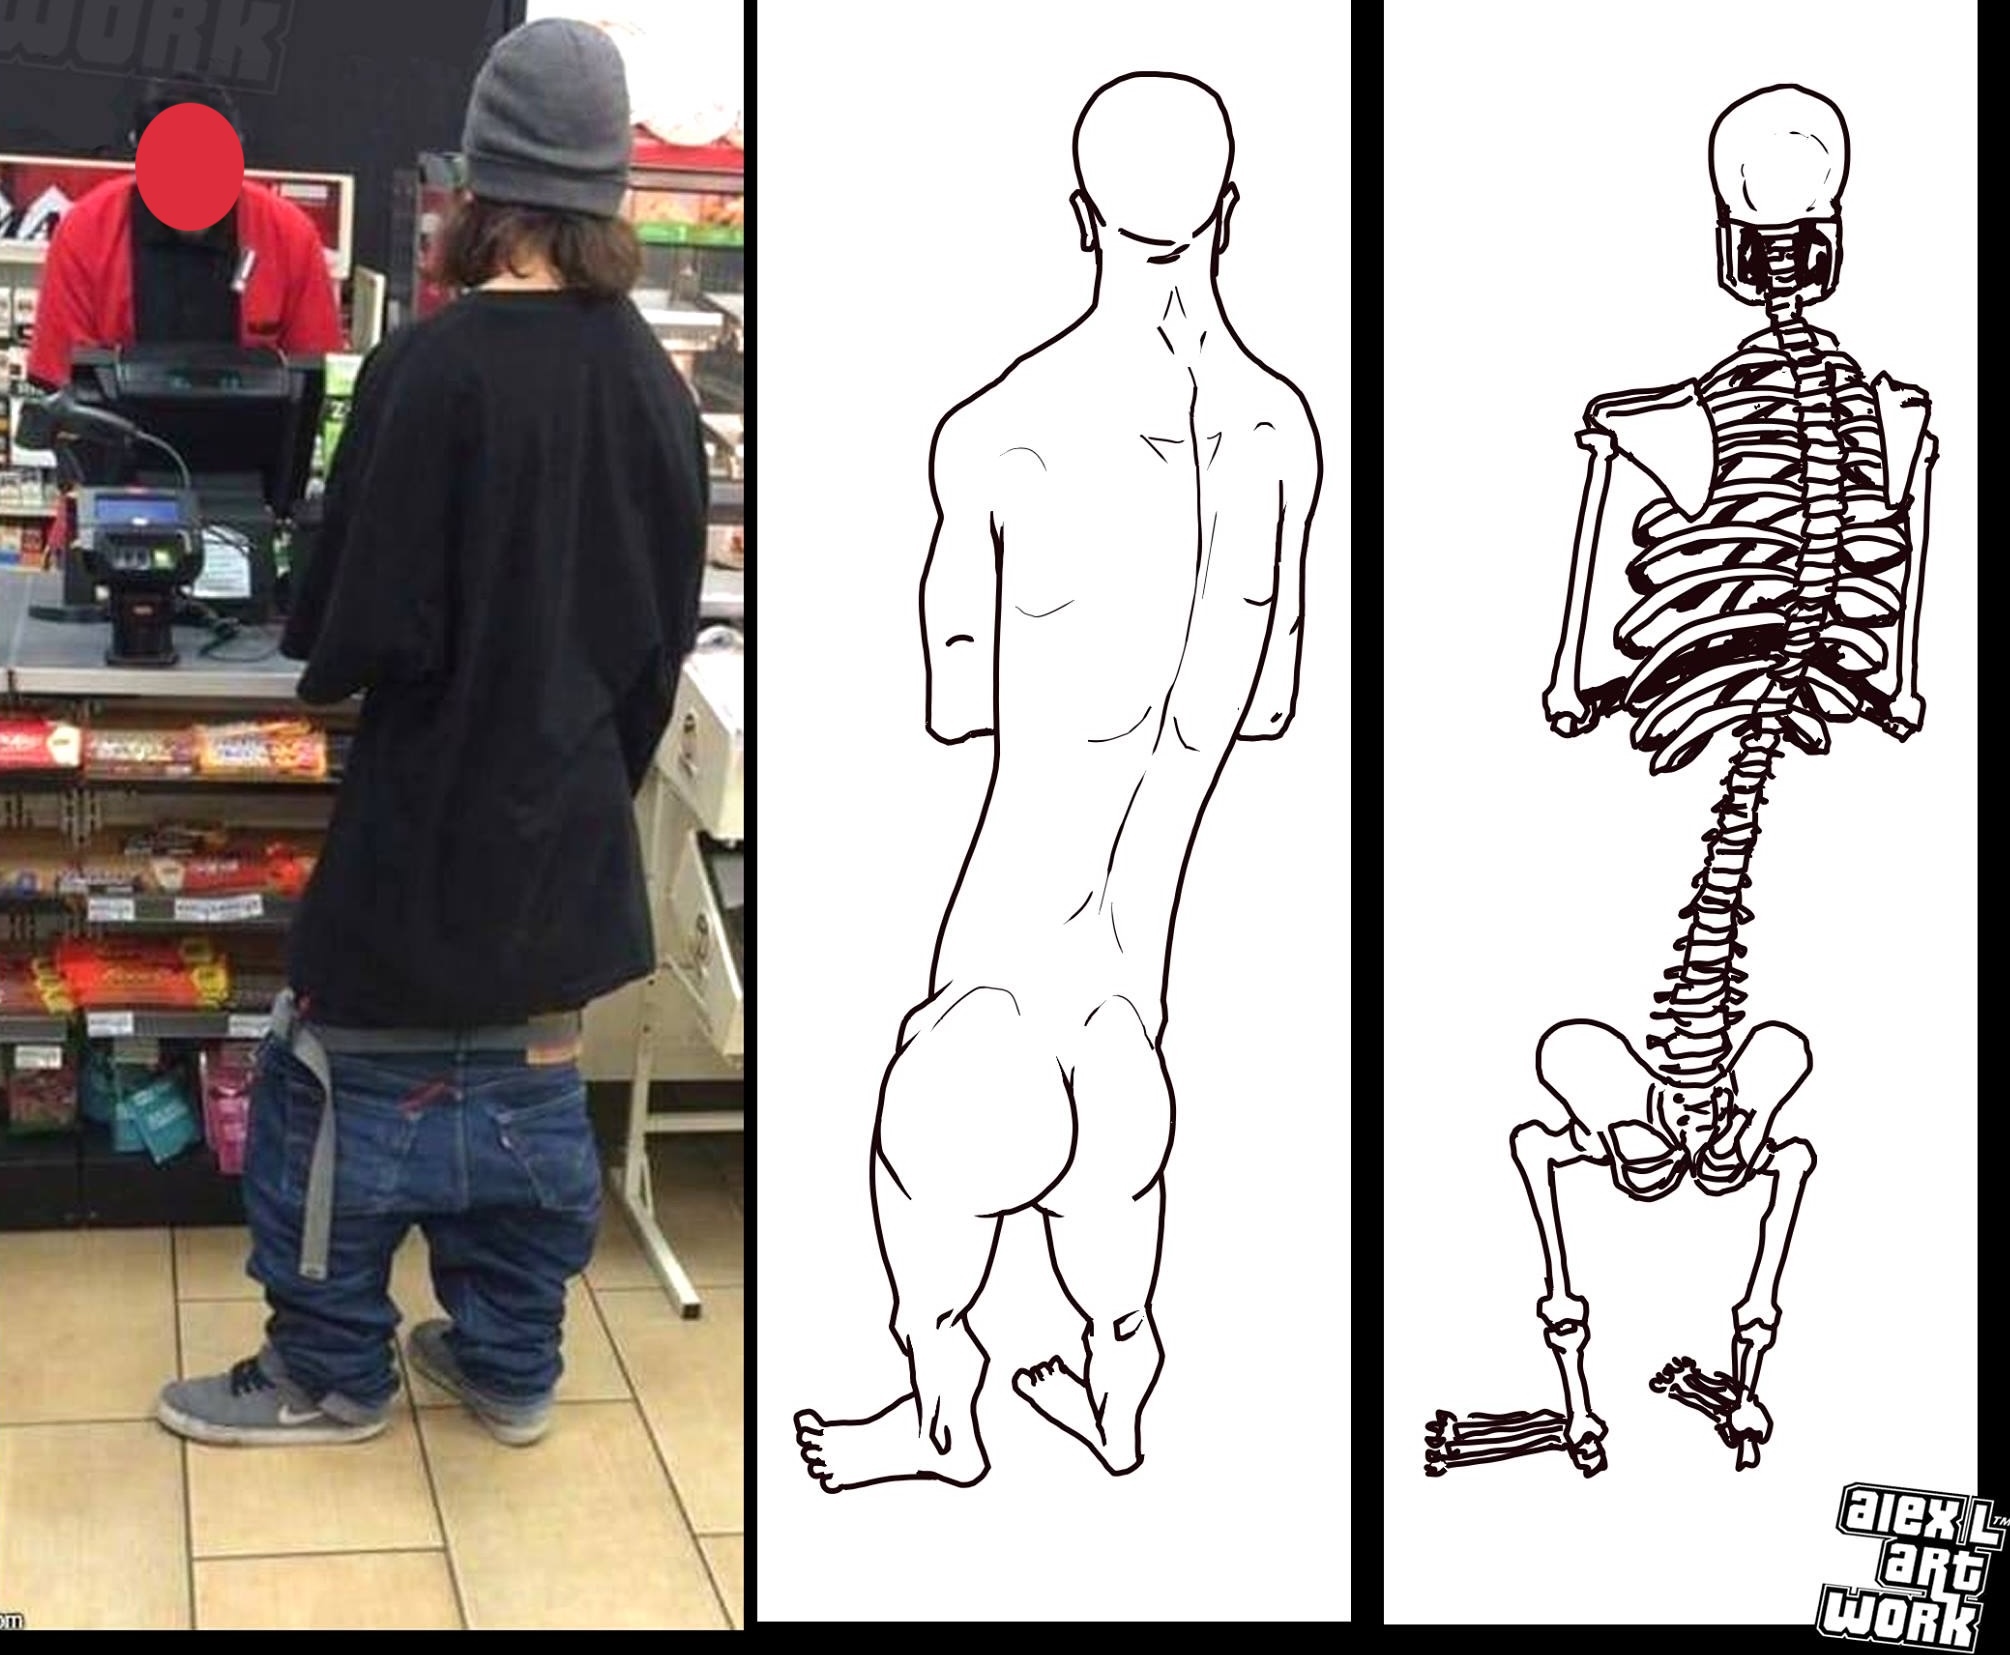
Because BODIESReg uses detected keypoints to initialize 3D pose, errors in those keypoints can propagate into later registration steps. In BODIESReg, the pose editor provides a manual way to correct the pose when automatic keypoint detection fails.
Closing
We built BODIESReg because we needed to batch-process optical and MR body scans, but could not find a published open-source framework for automatic registration without dataset-specific training. We also needed registrations that were not only numerically close, but anatomically meaningful.
BODIESReg runs locally, works on modest hardware, and includes manual correction tools for difficult cases. The goal is practical: turn scans into anatomy-aware data that can be measured, compared, and used in downstream biomechanical models.
Project Links
Paper authors: Vikash Chaurasia, Judit Cueto Fernandez, J. Micah Prendergast, and Eline van der Kruk.